【Latex】30分钟学会LaTeX
本文是笔记。尊重原文,参考原文地址。
1. 什么是LaTeX?
\(L^AT_EX\) 发音为 "LAY-tek" 亦或是 "LAH-tek"。是一款用于排版专业外观文档的工具。然而,Latex的工作方式类似于 Markdown。文档\(\xrightarrow[排版]{TeX引擎}\)排版后文档。这意味着能够通过LaTeX语法来产生专业排版的PDF文件。
2. 为什么要学习 LaTeX?
你当然可以提出各种拒绝使用LaTeX的理由,那是你的事儿。But 最终选择LaTeX的用户往往在意以下优点:
- 支持排版极其复杂的数学、表格和其他科学的技术内容;
- 脚注、交叉引用和书目管理设施;
- 易于制作复杂或繁琐的文档元素,如索引、词汇表、目录、图表列表;
- 强大的编程性和可扩展性,数千个插件,高度定制;
总而言之,各种好处,不胜枚举。当然,有些类型的文档 LaTeX 并不擅长,这类“自由格式”文档往往通过 Word 解决。
与 Markdown 类似,LaTeX 将文档的内容和其样式进行了分离。更换“主题”无需修改内容即可修改样式。
3. 编写你的第一篇 LaTeX 代码
第一步是创建一个新的 LaTeX 项目,在电脑上创建一个新的 .tex 文件来完成此操作。在”尊贵“的 mac 上用终端命令做到这一步。
\documentclass{article}
\begin{document}
First document. This is a simple example, with no
extra parameters or packages included.
\end{document}
此示例将产生的输出:

你可以看到,LaTeX 已自动缩进段落首行,帮你处理好了格式问题。让我们仔细看看代码的每个部分都做了什么。
第一行代码 \documentclass{article} 申明了文档类型,它控制文档的整体外观。设置好文档类型后,文档的内容介于 \begin{document} 和 \end{document} 标签之间。
4. 文档 preamble
文档的 preamble是有别于 body 中的内容的。最小的文档 \(preamble\) 如下所示:
其中 \documentclass[12pt, letterpaper]{article} 定义了文档的整体类。
在此示例中,这两个参数执行以下操作:
- 12pt设置字体大小
- letterpaper设置纸张尺寸
当然,也可以使用其他字体大小,9pt、11pt、12pt,但如果未指定,则默认大小为10pt。置于纸张尺寸,其他可能的值有 a4papaer 和 legalpaper。更多信息参阅。
这是一个加载外部包的示例,使其能够导入外部图形文件。查找和使用LaTeX包。
5. 包括标题、作者和日期信息
在 \(preamble\) 中(注意不是文档正文)添加三行
- \title{My first LaTeX document}: 文档标题
- \author{Sy IoOozZzz}: 作者姓名,可选\thanks{}命令。
- \thanks{Funded by the HollowSyight}: 可以添加到作者姓名后,位于 author 命令的括号内。如果你需要致谢某个机构,这非常有用。
- \date{August 2022}: 你可以手动输入日期,也可以 \today 在每次文档编译时使用命令排版当前的日期。
添加后你的 \(preamble\) 大体是这样的:
\documentclass[12pt, letterpaper]{article}
\title{My first LaTeX document}
\author{Hubert Farnsworth\thanks{Funded by the Overleaf team.}}
\date{August 2022}
\begin{document}
\maketitle
We have now added a title, author and date to our first \LaTeX{} document!
\end{document}
用 \maketitle 添加或排版(官方用语为 \(typeset\) )标题,作者和日期。
效果如下:

6. 添加注释
LaTeX 是一种代码,专注于文档排版。因此,与其他任何编程语言写的代码一样,在文档中添加注释非常有用。
要在 LaTeX 中添加注释,只需 % 起手(行首写一个%):
\documentclass[12pt, letterpaper]{article}
\title{My first LaTeX document}
\author{Hubert Farnsworth\thanks{Funded by the Overleaf team.}}
\date{August 2022}
\begin{document}
\maketitle
We have now added a title, author and date to our first \LaTeX{} document!

% This line here is a comment. It will not be typeset in the document.
\end{document}
7. 粗体、斜体和下换线
- \(\textbf{粗体}\):
\textbf{} - \(\textit{斜体}\):
\textit{} - \(\underline{下划线}\):
\underline{}
Some of the \textbf{greatest}
discoveries in \underline{science}
were made by \textbf{\textit{accident}}.
8. 添加图像
\documentclass{article}
\usepackage{graphicx} %LaTeX package to import graphics
\graphicspath{{images/}} %configuring the graphicx package

\begin{document}
The universe is immense and it seems to be homogeneous,
on a large scale, everywhere we look.

% The \includegraphics command is
% provided (implemented) by the
% graphicx package
\includegraphics{universe}

There's a picture of a galaxy above.
\end{document}
效果:

要是用该 graphics 包,在 preamble 中包含下行:
若用 OverLeaf,使用\graphicspath{{images/}} 告知 LaTeX 图像保存路径。
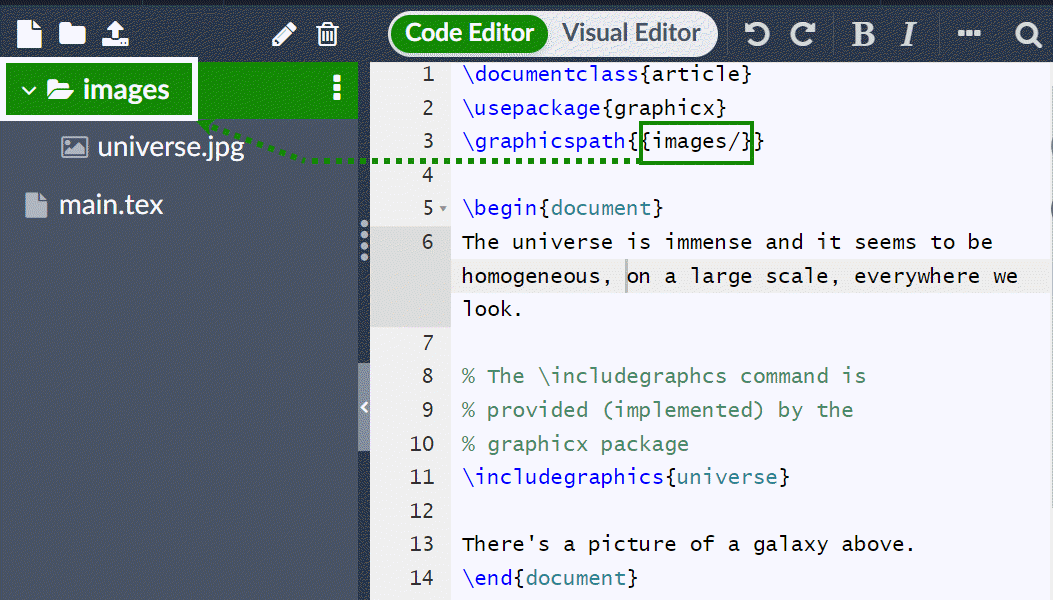
注意文件名,最佳做法是省略扩展名。一般来说,图片的文件名不应该包含空格或多个点;若上传到 Overleaf 建议使用小写字母作为文件扩展名。
9. 标题、标签和参考
可以通过 \(figure\) 来引用图像。
\documentclass{article}
\usepackage{graphicx}
\graphicspath{{images/}}

\begin{document}

\begin{figure}[h]
    \centering
    \includegraphics[width=0.75\textwidth]{mesh}
    \caption{A nice plot.}
    \label{fig:mesh1}
\end{figure}

As you can see in figure \ref{fig:mesh1}, the function grows near the origin. This example is on page \pageref{fig:mesh1}.

\end{document}
将产生的效果:

示例中几个值得注意的命令:
- \includegraphics[width=0.75\textwidth]{mesh}:这种形式\includegraphics指示LaTeX将图形的宽度设置为文本宽度的 75%——其值存储在\textwidth命令中。
- \caption{A nice plot.}:顾名思义,此命令用于设置图形标题,可以放置在图形上方或下方。如果您创建了图形列表,则此标题将在该列表中使用。
- \label{fig:mesh1}:要在文档中引用此图像,请使用该命令为其添加标签\label。该标签用于为图像生成编号,并与下一个命令结合使用,即可引用该图像。
- \ref{fig:mesh1}:此代码将被对应于参考图的数字替换。
10. 在LaTeX中创建列表
无序列表:
\documentclass{article}
\begin{document}
\begin{itemize}
  \item The individual entries are indicated with a black dot, a so-called bullet.
  \item The text in the entries may be of any length.
\end{itemize}
\end{document}
其效果:

有序列表:
\documentclass{article}
\begin{document}
\begin{enumerate}
  \item This is the first entry in our list.
  \item The list numbers increase with each entry we add.
\end{enumerate}
\end{document}
效果:

11. Adding math to LaTeX
11.1 inline math mode
\documentclass[12pt, letterpaper]{article}
\begin{document}
In physics, the mass-energy equivalence is stated
by the equation $E=mc^2$, discovered in 1905 by Albert Einstein.
\end{document}

排版 inline-mode math 你可以用:\( ... \), $ ... $ 亦或是 \begin{math} ...\end{math}。
11.2 Display math mode
\documentclass[12pt, letterpaper]{article}
\begin{document}
The mass-energy equivalence is described by the famous equation
\[ E=mc^2 \] discovered in 1905 by Albert Einstein.

In natural units ($c = 1$), the formula expresses the identity
\begin{equation}
E=m
\end{equation}
\end{document}

使用 \[ ... \]or\begin{displaymath}...\end{displaymath}or\begin{equation}...\end{equation}or$$...$$
更加完整的例子:
\documentclass{article}
\begin{document}
Subscripts in math mode are written as $a_b$ and superscripts are written as $a^b$. These can be combined and nested to write expressions such as

\[ T^{i_1 i_2 \dots i_p}_{j_1 j_2 \dots j_q} = T(x^{i_1},\dots,x^{i_p},e_{j_1},\dots,e_{j_q}) \]

We write integrals using $\int$ and fractions using $\frac{a}{b}$. Limits are placed on integrals using superscripts and subscripts:

\[ \int_0^1 \frac{dx}{e^x} =  \frac{e-1}{e} \]

Lower case Greek letters are written as $\omega$ $\delta$ etc. while upper case Greek letters are written as $\Omega$ $\Delta$.

Mathematical operators are prefixed with a backslash as $\sin(\beta)$, $\cos(\alpha)$, $\log(x)$ etc.
\end{document}

更多例子:
\documentclass{article}
\usepackage{amsmath}% For the equation* environment
\begin{document}
\section{First example}

The well-known Pythagorean theorem \(x^2 + y^2 = z^2\) was proved to be invalid for other exponents, meaning the next equation has no integer solutions for \(n>2\):

\[ x^n + y^n = z^n \]

\section{Second example}

This is a simple math expression \(\sqrt{x^2+1}\) inside text.
And this is also the same:
\begin{math}
\sqrt{x^2+1}
\end{math}
but by using another command.

This is a simple math expression without numbering
\[\sqrt{x^2+1}\]
separated from text.

This is also the same:
\begin{displaymath}
\sqrt{x^2+1}
\end{displaymath}

\ldots and this:
\begin{equation*}
\sqrt{x^2+1}
\end{equation*}
\end{document}

12. 基本文档结构
12.1 摘要
\documentclass{article}
\begin{document}
\begin{abstract}
This is a simple paragraph at the beginning of the
document. A brief introduction about the main subject.
\end{abstract}
\end{document}

12.2 段落与换行
写好摘要后,我们可以开始书写第一个段落。用 \\ 手动换行 or \newline 命令。
\documentclass{article}
\begin{document}

\begin{abstract}
This is a simple paragraph at the beginning of the
document. A brief introduction about the main subject.
\end{abstract}

After our abstract we can begin the first paragraph, then press ``enter'' twice to start the second one.

This line will start a second paragraph.

I will start the third paragraph and then add \\ a manual line break which causes this text to start on a new line but remains part of the same paragraph. Alternatively, I can use the \verb|\newline|\newline command to start a new line, which is also part of the same paragraph.
\end{document}

12.3 章节 - chapter
较长的文档通常被分为若干部分,章节、小节等。LaTeX中提供了文档结构化命令,但可用的命令和功能取决于文档类\documentclass。例如,\documentclass { book } 支持将文档划分为部分,但 \documentclass { letter } 不支持。
\documentclass { book }
\begin { document }

\chapter {第一章}

\section {简介}
这是第一部分。
Lorem ipsum dolor 坐在 amet,consectetuer adipiscing   elit。 Etiam lobortisfacilisis sem。 Nullam nec mi et
neque pharetra sollicidin。 Praesent imperdietmi nec ante。
Donec ullamcorper,felis non sodales... \section {第二节}
Lorem ipsum dolor sat amet,consectetuer adipiscing elit。   Etiam lobortis facilisissem。 Nullam nec mi et neque pharetra sollicidin。 Praesent imperdiet mi necante... \subsection {第一小节}
Praesent imperdietmi necante。 Donec ullamcorper,felis non sodales... \section* {未编号部分}
Lorem ipsum dolor sat amet,consectetuer adipiscing elit。   Etiam lobortis facilisissem... \end {文档}

章节令文章结构一目了然,对人脑的信息处理是极其好的。例如,\chapter{First Chapter} 会创建一个名为 First Chapter 的章节,\section{Introduction} 生成一个名为 Introduction 的章节,等等。章节可以进一步划分为 \subsection{} 甚至 \subsubsection{}。但可以使用末尾带星号的版本来禁用,例如\section*{...}和\subsection*{...}。
总的来说,LaTeX 文档类提供了下面这些分段命令,每个类都支持相关的子集: - \part{part} - \chapter{chapter} - \section{section} - \subsection{subsection} - \subsubsection{subsubsection} - \paragraph{paragraph} - \subparagraph{subparagraph}
特别说明,\part 和 \chapter 命令只能在 report 和 book 文档类中使用。
更多信息关于 Chapter。
13. 创建表
13.1 基本
示例:
\begin{center}
\begin{tabular}{c c c}
 cell1 & cell2 & cell3 \\
 cell4 & cell5 & cell6 \\
 cell7 & cell8 & cell9
\end{tabular}
\end{center}

添加边框。\hline以添加水平线规则,此示例中 {|c|c|c|} 声明了三个列,每个列由一条垂直线分隔。
\begin{center}
\begin{tabular}{|c|c|c|}
 \hline
 cell1 & cell2 & cell3 \\
 cell4 & cell5 & cell6 \\
 cell7 & cell8 & cell9 \\
 \hline
\end{tabular}
\end{center}
产生的输出:

额外的例子:
\begin{center}
 \begin{tabular}{||c c c c||}
 \hline
 Col1 & Col2 & Col2 & Col3 \\ [0.5ex]
 \hline\hline
 1 & 6 & 87837 & 787 \\
 \hline
 2 & 7 & 78 & 5415 \\
 \hline
 3 & 545 & 778 & 7507 \\
 \hline
 4 & 545 & 18744 & 7560 \\
 \hline
 5 & 88 & 788 & 6344 \\ [1ex]
 \hline
\end{tabular}
\end{center}****

13.2 Caption、Title、Reference
类似于图片的 Caption、Title。
Table \ref{table:data} shows how to add a table caption and reference a table.
\begin{table}[h!]
\centering
\begin{tabular}{||c c c c||}
 \hline
 Col1 & Col2 & Col2 & Col3 \\ [0.5ex]
 \hline\hline
 1 & 6 & 87837 & 787 \\
 2 & 7 & 78 & 5415 \\
 3 & 545 & 778 & 7507 \\
 4 & 545 & 18744 & 7560 \\
 5 & 88 & 788 & 6344 \\ [1ex]
 \hline
\end{tabular}
\caption{Table to test captions and labels.}
\label{table:data}
\end{table}

14. 添加目录
极其简单,因为 \tableofcontents 几乎为你完成了所有工作:
\documentclass{article}
\title{Sections and Chapters}
\author{Gubert Farnsworth}
\date{August 2022}
\begin{document}

\maketitle

\tableofcontents

\section{Introduction}

This is the first section.

Lorem  ipsum  dolor  sit  amet,  consectetuer  adipiscing
elit.   Etiam  lobortisfacilisis sem.  Nullam nec mi et
neque pharetra sollicitudin.  Praesent imperdietmi nec ante.
Donec ullamcorper, felis non sodales...

\section*{Unnumbered Section}
\addcontentsline{toc}{section}{Unnumbered Section}

Lorem ipsum dolor sit amet, consectetuer adipiscing elit.
Etiam lobortis facilisissem.  Nullam nec mi et neque pharetra
sollicitudin.  Praesent imperdiet mi necante...

\section{Second Section}

Lorem ipsum dolor sit amet, consectetuer adipiscing elit.
Etiam lobortis facilisissem.  Nullam nec mi et neque pharetra
sollicitudin.  Praesent imperdiet mi necante...
\end{document}
